Anonymous Inline Event Handlers
January 9, 2008
Not all of our event handlers contain massive amounts of code, every now and again all we want is a line or two of code. With anonymous delegates we can write our event handlers inline, saving us creating new methods for just a couple of lines. There is an argument that a simple inline event handler is easier to read and follow. I’ve seen more and more using this technique, just make sure its not abused.
yellow.Click += new RoutedEventHandler(delegate(object s, RoutedEventArgs re) { gshape.Fill = Brushes.Yellow; });
Hosting MSBuild
October 29, 2007
Most people tend to use MSBuild via a few standard scenarios. Inside Visual Studio, from the command line and invoked by a continuous integration system such as Cruise Control are probably the most common.
The MSBuild framework is very flexible and we can very easily host the build engine ourselves with very little effort.
All we need to do is:
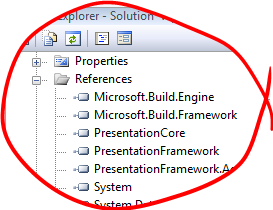
Add a reference to the MsBuild engine and framework.
Its often a good idea to run MSBuild in its own thread. If your application is running in an MTA thread then you’ll need to do this otherwise you will get a lot of warnings. If you want to see this try creating a Powershell script that invokes MSBuild through .net rather than calling msbuild.exe.
Create and invoke the engine:
Engine engine = new Engine();
engine.BinPath = @"C:\Windows\Microsoft.NET\Framework\v2.0.50727\";

ConsoleLogger logger = new ConsoleLogger();

engine.RegisterLogger(logger);

bool result = engine.BuildProjectFile(
    @"C:\Projects\MyProj.csproj",
    "Build");

if (result)
{
    MessageBox.Show("Build Suceeded");
}
else
{
    MessageBox.Show("Build Failed");
}
There are two loggers that come with the base framework, the ConsoleLogger and FileLogger. Its pretty obvious from there names as to what they do. If we are hosting msbuild then chances are they won’t meet all of there needs. Fortunately we can roll our own fairly easily by implementing the ILogger interface.
public class MyLogger : ILogger
Then set up some events to handle all of the logging.
public void Initialize(IEventSource eventSource)
{
    eventSource.ProjectStarted += new ProjectStartedEventHandler(eventSource_ProjectStarted);
    eventSource.TaskStarted += new TaskStartedEventHandler(eventSource_TaskStarted);
    eventSource.MessageRaised += new BuildMessageEventHandler(eventSource_MessageRaised);
    eventSource.WarningRaised += new BuildWarningEventHandler(eventSource_WarningRaised);
    eventSource.ErrorRaised += new BuildErrorEventHandler(eventSource_ErrorRaised);
    eventSource.ProjectFinished += new ProjectFinishedEventHandler(eventSource_ProjectFinished);

}
Write some handlers for these events. This is where we get the details of the error/warning/message and handle it as we please. It this example we are just writing it to the debug output window.
void eventSource_WarningRaised(object sender, BuildWarningEventArgs e)
{
    //Handle the logging event
    System.Diagnostics.Debug.WriteLine(e.Message);
}
Worker threads and the Dispatcher in WPF
October 29, 2007
WPF is very similar to Windows Forms in terms of its multi threaded capabilities. While it does use multiple threads as part of the rendering pipeline as far as a user of WPF is concerned the UI is single threaded. So the old rule that we must do all of our UI updates from the main thread still applies.
In Windows Forms we would use Control.Invoke to send work back to our main thread. WPF is very similar. It provides the Dispatcher which allows us to Invoke back onto the main thread.
Its reasonably straight forward to use. We provide a delegate that we would like to run on the main thread, and ask the Dispatcher to run it using either Invoke (for synchronous running) or BeginInvoke (for async running).
Consider the following example. We have a simple window with a label and on startup we create a thread that simulates a long running task (in this case calculating Pi, with a few sleeps to slow it down). The thread will then use the Dispatcher to periodically update the UI with its progress.
Xaml:
<Window x:Class="DispatcherApp.Window1"
    xmlns="http://schemas.microsoft.com/winfx/2006/xaml/presentation"
    xmlns:x="http://schemas.microsoft.com/winfx/2006/xaml"
    Title="Window1" Height="111" Width="535">
    <Grid>
        <Label Margin="13,22,19,24" Name="label1">Label</Label>
    </Grid>
</Window>
C#:
using System;
using System.Windows;
using System.Threading;

namespace DispatcherApp
{
    delegate void UpdateTheUI(string newText);

    public partial class Window1 : Window
    {
        public Window1()
        {
            InitializeComponent();

            Thread thrd = new Thread(new ThreadStart(this.CalculatePi));
            thrd.Start();
        }

        void CalculatePi()
        {
            double res = 0.0;
            for (int i = 0; i < 20; i++)
            {
                Thread.Sleep(1000);

                res += Factorial(2 * i) /
                    (Math.Pow(Factorial(i), 2) * ((2 * i) + 1) * Math.Pow(16, i));

                string piText = (res * 3.0).ToString();

                this.Dispatcher.BeginInvoke(
                    System.Windows.Threading.DispatcherPriority.Normal,
                    (UpdateTheUI)delegate(string text)
                    {
                        label1.Content = text;
                    }, piText);

            }

        }

        double Factorial(long value)
        {
            long returnVal = 1;
            for (long i = 2; i <= value; i++)
            {
                returnVal *= i;
            }
            return (double)returnVal;
        }

    }
}
Its worth noting that there are other ways to do this in WPF. The BackgroundWorker provides similar capabilities and might be more appropriate in some circumstances.
ReaderWriterLock Reborn
October 19, 2007
It turns out the ReaderWriterLock has a few flaws, it’s not that it doesn’t work. It just doesn’t work as well as it should. Microsoft have admitted its not as good as it could be and have provided another Reader-Writer lock implementation in .net 3.5 called ReaderWriterLockSlim.
They have decided not to change the existing ReaderWriterLock for backwards compatibility issues, instead we have two versions. For virtually all use cases we should be switching to the new ReaderWriterLockSlim but there are a few subtle differences which can affect which one we choose.
ReaderWriterLock
- Is slow, about 6-7x slower than a Monitor.Enter
- Favors read locks, if you have lots of read lock requests then it can prove difficult for a write to get a lock. Depending on how many of which type of lock gets requested you can end up with a situation where your Write requests are waiting a long time.
- Upgrading a reader to a writer is not atomic.
Jeff Richter has a great MSDN article about its deficiencies.
ReaderWriterLockSlim
- Is much quicker, only 2x slower than a Monitor.Enter.
- Favors writes over reads.
- Upgrades from reader to writer are atomic.
And the cons, which will determine if we should be using the original.
- Doesn’t handle ThreadAbort exceptions or Out Of Memory Exceptions very well. Can end up pegging the CPU at 100%. This should not really be much of an issue in practice since we shouldn’t really be forcing aborts that raise thread abort exceptions and out of memory exceptions are extremely difficult to recover from anyway.
- Not suitable for use in hosted CLR scenarios such as SQL Server, use the original if you want to run your code inside of SQL server.
Synchronization with the ManualResetEvent
October 15, 2007
The lock statement is probably the best known and most used of the synchronization methods in C#, but there are many more. Of these the Manual Reset Event is worthy of a mention. It allows very simple cross thread signalling. This allows us to create threads that wait for things to happen on other threads before proceeding.
The principle of the ManualResetEvent is fairly simple. One thread waits for the other thread to signal. Once it has signalled the first thread carries on. The waiting is done with .Wait and the signalling with .Set. We can ready the whole thing for use again (reseting it) by calling .Reset.
The little program below shows a very simple example of this. The main thread creates a second thread. The main thread now waits. The second thread counts to three, when its done this it signals. The main thread picks up the signal and carries on.
using System;

using System.Collections.Generic;

using System.Linq;

using System.Text;

using System.Threading;


namespace ManualResetEventTest

{

    class Program

    {

        static void Main(string[] args)

        {

            Console.WriteLine("Main Thread Started");


            ManualResetEvent sync = new ManualResetEvent(false);


            Thread thread = new Thread(new ParameterizedThreadStart(Thread2));

            thread.Start((object)sync);


            sync.WaitOne();


            Console.WriteLine("Main Thread Finished");

        }


        static void Thread2(object parameter)

        {

            ManualResetEvent sync = (ManualResetEvent)parameter;


            Thread.Sleep(TimeSpan.FromSeconds(1));

            Console.WriteLine("One");


            Thread.Sleep(TimeSpan.FromSeconds(1));

            Console.WriteLine("Two");


            Thread.Sleep(TimeSpan.FromSeconds(1));

            Console.WriteLine("Three");


            sync.Set();

        }

    }

}
When we run the program we get the following output:
Main Thread Started

One

Two

Three

Main Thread Finished
This is how the flow of execution looks


There is of course the AutoResetEvent which is nearly identical except it automatically resets after it has been signalled, so it’s immediately ready to use again.
C# and its Learning Curve
October 12, 2007
Back in its day Visual Basic had a reputation as being overly simple. In the dot com boom of the late 90’s people who had never been software developers or who had no natural interest in software development jumped on a bandwagon in search of a quick buck. The reason they could do this was because the common language of the day allowed them to, VB was simple enough that they could wing there way through a simple software project. The void between VB and C++ was huge, you had to be good to develop in C++. VB didn’t demand such high standards. With the demand for developers so high these people with no previous experience in development could fake there way through a few jobs armed with a handful of ‘… for Dummies’ and ‘Teach yourself … in 21 Days’ books.
Fast forward a few years to the present day. Visual Basic as it was has pretty much disappeared, on the Microsoft side C# has rightfully taken its place. Most of our bandwagon developers have probable all changed careers and become plumbers. C# and .Net are more complicated than VB. They have the features and complexities of a proper language; Threads, delegates, proper object orientation and much more. Our bandwagon developer of yester-year never had any of this complexity and this is one of the reasons they could get away with what they did. VB had a shallow learning curve and the barrier to entry wasn’t so high.
Since hitting the scene in 2002 C# and .net have grown in power and complexity. Generics, LINQ, anonymous methods, WPF and much more have all appeared since that first release. Learning C# to the level that one would expect from a good developer is a lot harder than what it was in 2002. There’s more to it and some of the concepts are more taxing to get your head around.
Take WPF and WinForms. WPF is a great technology and I think there should be a real push to get desktop applications to use it but its harder to learn than WinForms. Attached properties, routed events and all the other new concepts are not intuitive or obvious to a lot of people. The learning curve is steeper than it is for WinForms and not every one will be able to make it all the way to the top.
What does this mean in reality? Software development isn’t easy, its not a meal ticket for those that want to make some easy money. To be sucessfull you need to be good. For someone to be proficient developer in .net 3.5 they are going to have to learn a lot more than they would have to get to the same level in .net 1. The increased size and steepness of the learning curve is going to raise the barrier to entry. It may not be that there are is going to be a shortage of people coming forward with C# skills, it may be that those with the top skills and the deepest understanding are going to be even harder to find than they are today.
lock with a timeout
October 3, 2007
Every half decent c# developer should know all about the lock statement.
lock(obj)
{
    //Do stuff
}
And most of these will know that it equates to a Monitor.Enter/Monitor.Exit wrapped up in a try/finally block.
The monitor class also supports time outs on the Enter. So we can create a lock statement that times out with the following.
if (Monitor.TryEnter(obj, TimeSpan.FromMinutes(2.0)))
{
    try
    {
        //Do stuff
    }
    finally
    {
        Monitor.Exit(obj);
    }
}
else
{
    //Timeout
}
Pre Build Events and the Before Build Target
September 25, 2007
Its quite common to use pre and post build events in your c# projects. You enter the command you want to run in the project properties, like below.

But this isn’t the only way to achieve this. There is another way by editing your .csproj file and using the BeforeBuild target.
First lets look how the PreBuildEvent from the project properties is actually handled. At the bottom of your project file you’ll find a property that lists your command.
<PropertyGroup>
  <PreBuildEvent>copy $(OutDir)\test.blah c:\test</PreBuildEvent>
</PropertyGroup>
If you follow your imports in your project file you’ll find that your PreBuildEvent is handled by the PreBuildEvent target in Microsoft.Common.Targets. What does this do? It calls the Exec task on your command, which runs in as any other command prompt command.
<Target
    Name="PreBuildEvent"
    Condition="'$(PreBuildEvent)'!=''"
    DependsOnTargets="$(PreBuildEventDependsOn)">
<Exec WorkingDirectory="$(OutDir)" Command="$(PreBuildEvent)" />
</Target>
In your .csproj file you will find out two targets (BeforeBuild and AfterBuild) that have been commented out. The other way is to uncomment these and add msbuild tasks. These targets are called exactly when their name suggests.
<Target Name="BeforeBuild">
</Target>
If we want to copy a file then we can use the Copy task
<Target Name="BeforeBuild">
       <Copy SourceFiles="c:\test.txt" DestinationFolder="d:\dest\"/>
</Target>
No command line, no batch files. Just pure msbuild
Creating .ISO Files with MSBuild
September 25, 2007
In a previous post I mentioned about creating your final output media as part of the build process. This can often include CD or DVDs. A great format to have these in is a .iso file. This is a close to having an actual disk as you can get.
There is nothing in MSBuild to do this for you so i’ve rolled a custom task to do it. Creating an iso file is normally non-trivial but luckily for us Microsoft have added this functionality into the OS with IMAPIv2.
If your running Vista everything you need is installed. For XP Sp2 and Server 2003 you’ll need the following updates.
IMAPIv2 for Server 2003
IMAPIv2 for XP Sp2
IMAPIv2 is COM API which is easy to use in C#. The main implementation in the Execute method is quite simple. Setup the file system, get the root directory, add a tree of files, Create the image and finally copy the image stream to disk.
ifs.MsftFileSystemImage fs = new IMAPI2FS.MsftFileSystemImage();
ifs.FsiDirectoryItem dir = fs.Root;
fs.FileSystemsToCreate = IMAPI2FS.FsiFileSystems.FsiFileSystemISO9660 |
                          IMAPI2FS.FsiFileSystems.FsiFileSystemJoliet;fs.VolumeName = _volumeName;
dir.AddTree(_treeRoot, false);
ifs.FileSystemImageResult res = fs.CreateResultImage();
ifs.FsiStream stream = res.ImageStream;
return CreateISOFile(_outputFileName, (System.Runtime.InteropServices.ComTypes.IStream)stream);
In your msbuild file, add a reference to the target:
<UsingTask TaskName="Belfield.Build.Tasks.CreateOpticalDiskImageTask" AssemblyFile="buildtasks.dll"/>
To create the image call the task in one of your targets
<CreateOpticalDiskImageTask OutputFileName="c:\build\cd.iso"
            TreeRoot="c:\build\output\" VolumeName="My Product" />
(Note: The source project is set to generate CD-ROM images at the moment, for DVDs you need to change the filesystem)
