Synchronization with the ManualResetEvent
October 15, 2007
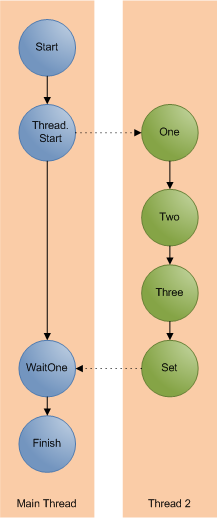
The lock statement is probably the best known and most used of the synchronization methods in C#, but there are many more. Of these the Manual Reset Event is worthy of a mention. It allows very simple cross thread signalling. This allows us to create threads that wait for things to happen on other threads before proceeding.
The principle of the ManualResetEvent is fairly simple. One thread waits for the other thread to signal. Once it has signalled the first thread carries on. The waiting is done with .Wait and the signalling with .Set. We can ready the whole thing for use again (reseting it) by calling .Reset.
The little program below shows a very simple example of this. The main thread creates a second thread. The main thread now waits. The second thread counts to three, when its done this it signals. The main thread picks up the signal and carries on.
using System;

using System.Collections.Generic;

using System.Linq;

using System.Text;

using System.Threading;


namespace ManualResetEventTest

{

    class Program

    {

        static void Main(string[] args)

        {

            Console.WriteLine("Main Thread Started");


            ManualResetEvent sync = new ManualResetEvent(false);


            Thread thread = new Thread(new ParameterizedThreadStart(Thread2));

            thread.Start((object)sync);


            sync.WaitOne();


            Console.WriteLine("Main Thread Finished");

        }


        static void Thread2(object parameter)

        {

            ManualResetEvent sync = (ManualResetEvent)parameter;


            Thread.Sleep(TimeSpan.FromSeconds(1));

            Console.WriteLine("One");


            Thread.Sleep(TimeSpan.FromSeconds(1));

            Console.WriteLine("Two");


            Thread.Sleep(TimeSpan.FromSeconds(1));

            Console.WriteLine("Three");


            sync.Set();

        }

    }

}
When we run the program we get the following output:
Main Thread Started

One

Two

Three

Main Thread Finished
This is how the flow of execution looks

There is of course the AutoResetEvent which is nearly identical except it automatically resets after it has been signalled, so it’s immediately ready to use again.
C# and its Learning Curve
October 12, 2007
Back in its day Visual Basic had a reputation as being overly simple. In the dot com boom of the late 90’s people who had never been software developers or who had no natural interest in software development jumped on a bandwagon in search of a quick buck. The reason they could do this was because the common language of the day allowed them to, VB was simple enough that they could wing there way through a simple software project. The void between VB and C++ was huge, you had to be good to develop in C++. VB didn’t demand such high standards. With the demand for developers so high these people with no previous experience in development could fake there way through a few jobs armed with a handful of ‘… for Dummies’ and ‘Teach yourself … in 21 Days’ books.
Fast forward a few years to the present day. Visual Basic as it was has pretty much disappeared, on the Microsoft side C# has rightfully taken its place. Most of our bandwagon developers have probable all changed careers and become plumbers. C# and .Net are more complicated than VB. They have the features and complexities of a proper language; Threads, delegates, proper object orientation and much more. Our bandwagon developer of yester-year never had any of this complexity and this is one of the reasons they could get away with what they did. VB had a shallow learning curve and the barrier to entry wasn’t so high.
Since hitting the scene in 2002 C# and .net have grown in power and complexity. Generics, LINQ, anonymous methods, WPF and much more have all appeared since that first release. Learning C# to the level that one would expect from a good developer is a lot harder than what it was in 2002. There’s more to it and some of the concepts are more taxing to get your head around.
Take WPF and WinForms. WPF is a great technology and I think there should be a real push to get desktop applications to use it but its harder to learn than WinForms. Attached properties, routed events and all the other new concepts are not intuitive or obvious to a lot of people. The learning curve is steeper than it is for WinForms and not every one will be able to make it all the way to the top.
What does this mean in reality? Software development isn’t easy, its not a meal ticket for those that want to make some easy money. To be sucessfull you need to be good. For someone to be proficient developer in .net 3.5 they are going to have to learn a lot more than they would have to get to the same level in .net 1. The increased size and steepness of the learning curve is going to raise the barrier to entry. It may not be that there are is going to be a shortage of people coming forward with C# skills, it may be that those with the top skills and the deepest understanding are going to be even harder to find than they are today.
Vista booting and running from a USB Disk
October 10, 2007
I think i’ll have to create one of these myself, it seems quite straightforward.
Heisenbugs and Schroedinbugs
October 9, 2007
While batteling with some random bugs on a Friday afternoon I remembered these particular classes of bugs. I think its the names that appeal to the inner geek in me. Clever names but very geeky.
If you can’t remember the details of these or you’ve never heard of them before here’s a quick recap.
Schroedinbugs
Named after the famous Schroedingers Cat thought experiment. A Schroedinbug is one that only appears when you read the code and find something that should not work. At this point it stops working even though it was previosuly working fine.
Heisenbug
This ones based on Heisenbergs uncertaintity principle. In which the act of observing affects the measurement of the thing being observed. In software this is a bug that appears but that act of trying to debug it makes it go away. Bugs that only appear in release versions of code are classic examples.
Signtool and Get-AuthenticodeSignature
October 9, 2007
In my previous post on checking how much signed code is on your machine I used signtool.exe to verify if a file was signed. Powershell has a built in cmdlet called Get-AuthenticodeSignature for doing just this. So why did I use signtool?
Lets try a little test on good old notepad.exe
With Signtool.exe we get:
signtool verify /pa /a c:\windows\notepad.exe
Successfully verified: c:\windows\notepad.exe
and with Get-AuthenticodeSignature we get:
(Get-AuthenticodeSignature c:\windows\notepad.exe).Status
NotSigned
So signtool thinks its signed and Get-AuthenticodeSignature doesn’t. Notepad is signed but in a slightly different way to other files. OS files in Windows use catalog files to store their digital signatures. Signtool can be made to check these catalog files, which gives us a more accurate result when we are checking the amount of signed code on a system.
Is it signed?
October 4, 2007
Code signing is a great technology. Every software developer should be signing the code they produce. But how much of the code on your system is actually signed? Time for a little Powershell script to find out.
The easiest way to check a digital signature is with signtool.exe
$env:PATH = $env:PATH + ";C:\Program Files\Microsoft Visual Studio 8\Common7\Tools\Bin"
$startloc = "c:\windows"
set-location $startloc
$res = 0
$tot = 0
get-childitem -recurse | where {$_.Extension -match "exe"} | foreach-object {
    signtool verify /pa /a /q $_.FullName
    if($LastExitCode -eq 0) {
        $res = $res + 1
        write-host -foregroundcolor:green $_.FullName
    }
    else
    {
        write-host -foregroundcolor:red $_.FullName
    }
    $tot = $tot + 1
}
$pc = ($res / $tot) * 100.0
write-Host "Results"
write-Host "Signed: " $res
write-Host "Total: " $tot
write-Host "Percentage Signed: " $pc

Running over the windows directory gives 90%, showing that virtually all the Windows system files are signed. Running over C:\Program Files gives a less impressive 13% on my machine.
The Developers PC
October 3, 2007
Neons, Heatsinks that look like Taipei 101, water cooling, SLI, Crossfire and Over clocking are all de-rigueur in the world of gamers and modders but how much of that translates to the world of the developer.
All of these (except neons, — they’re just silly) are about getting every last bit of performance out of the PC. Making the machine as fast as possible.But there are downsides, the most notable being possible stability issues. The machine is pushed to the edge and if you’re not careful you can fall over.
At a completely different end of the PC market is the server. Servers need to be fast but they also need to be reliable, reliability is the King. Its all about uptime, a server going down costs money. Servers a built to be fast but more importantly they are built to be reliable. All of this comes at a cost, a lot of the parts that provide this reliabilty are expensive. And lets not forget the phenomenon which is the uber high-end workstation, or more simply the server class parts in a desktop chasis.
There are two schools of thought when it comes to the speed of the developer PC. One says give them the fastest possible, the other says give them the same hardware as your end users. That way they will produce software that will perform well on the type of machine that it is destined to be run on.
I sit in the first camp. Give developers the fastest machines possible, make them productive. Don’t let them sit around twiddling there thumbs while the compiler slowly churns through the code. It should be Quad Core, 4Gb RAM and 10,000RPM disks not some bog standard entry level Dell corporate desktop machine. If the average user spec machine is lower then get some of those machines to test on, not as primary dev machines. Create performance test that run on the lower spec machines, have performance bars that your software must meet. Don’t have developers continuously waiting for Visual Studio to catch up.
Where does the developer PC fit? I think the gamers approach is to close to the edge. The server/high-end workstation approach doesn’t offer value for money on the desktop. We need to live in some happy medium. 10,000RPM Raptors are fine, 15,000RPM SCSI drives aren’t worth the extra cash. Do we need 2GB of the fastest RAM around? Not really, we need lots of RAM. Buy more of the moderately fast RAM, and buy 4 or 8GB of it. Motherboards with dual 16x PCI-E slots are great and not because we can get some SLI action but because we can run 4 monitors. Give me two £150 graphics cards over one £300 card any day, I want to be able to run lots of monitors.
lock with a timeout
October 3, 2007
Every half decent c# developer should know all about the lock statement.
lock(obj)
{
    //Do stuff
}
And most of these will know that it equates to a Monitor.Enter/Monitor.Exit wrapped up in a try/finally block.
The monitor class also supports time outs on the Enter. So we can create a lock statement that times out with the following.
if (Monitor.TryEnter(obj, TimeSpan.FromMinutes(2.0)))
{
    try
    {
        //Do stuff
    }
    finally
    {
        Monitor.Exit(obj);
    }
}
else
{
    //Timeout
}
Pre Build Events and the Before Build Target
September 25, 2007
Its quite common to use pre and post build events in your c# projects. You enter the command you want to run in the project properties, like below.

But this isn’t the only way to achieve this. There is another way by editing your .csproj file and using the BeforeBuild target.
First lets look how the PreBuildEvent from the project properties is actually handled. At the bottom of your project file you’ll find a property that lists your command.
<PropertyGroup>
  <PreBuildEvent>copy $(OutDir)\test.blah c:\test</PreBuildEvent>
</PropertyGroup>
If you follow your imports in your project file you’ll find that your PreBuildEvent is handled by the PreBuildEvent target in Microsoft.Common.Targets. What does this do? It calls the Exec task on your command, which runs in as any other command prompt command.
<Target
    Name="PreBuildEvent"
    Condition="'$(PreBuildEvent)'!=''"
    DependsOnTargets="$(PreBuildEventDependsOn)">
<Exec WorkingDirectory="$(OutDir)" Command="$(PreBuildEvent)" />
</Target>
In your .csproj file you will find out two targets (BeforeBuild and AfterBuild) that have been commented out. The other way is to uncomment these and add msbuild tasks. These targets are called exactly when their name suggests.
<Target Name="BeforeBuild">
</Target>
If we want to copy a file then we can use the Copy task
<Target Name="BeforeBuild">
       <Copy SourceFiles="c:\test.txt" DestinationFolder="d:\dest\"/>
</Target>
No command line, no batch files. Just pure msbuild
Powershell as a Calculator
September 25, 2007
I loose count of the number of times I fire up calc.exe everyday to do a quick calculation. I was about to do it earlier today while working in Powershell until I thought, hold on Powershell is .net based, if I type in a number it should treat it as an int or double, and of course it does. So there is no need to start calc.exe just type the calculation straight in:

You couldn’t do that in cmd.exe
